Tuesday, September 20, 2016

Watch movie with Gear VR on Galaxy S7/S6(Edge)/Note7/5/4

Samsung Gear VR makes the experience more immersive and saves you from having to squint at the small screen. If you are (New or Old) Gear VR fan, you may want to know how to create 3D movies from 2D/3D videos/DVD/iTunes movies and properly watch 3D movies on your Gear VR

How to Create 3D movies from any video sources for Gear VR? 

To get the 3D movies you want to watch, you need make sure they are in the correct format. Samsung Gear VR by default supports most common file formats including MKV, MP4, AVI, and FLV. When it comes to playing 3D videos, Samsung Gear VR requires either side-by-side or top-to-bottom (top down). 

So, to play unsupported videos on Gear VR with SBS 3D MP4 effects, you need get a 3D Movie Converter to convert them to Gear VR playable 3D formats. Here we recommended you to try Hivimoore Video Converter Ultimate, a professional 3D Movie Converter. With it, you can effortlessly convert 2d/3d movie, DVD movies, iTunes movies and output SBS, Top-Bottom, Anaglyph 3D MKV, MP4 videos supported by Samsung Gear VR Unit/Innovator Edition with best quality easily. 

If you're using a Mac, please turn to Video Converter Ultimate for Mac, which allows you to convert any video sources to Samsung Gear VR on Mac OS X(macOS Sierra and El Capitan included). Now download the right version according to your situation and check out the steps below. 

  Original Price $69.95, Now $49.95 (Save $20) 

  Original Price $75.95, Now $59.95 (Save $16) 

Get below to see how to convert video/DVD to 3D SBS MP4/MKV in Windows (Windows 10 included). 

Part 2. How to convert movies to SBS 3D MP4/MKV for viewing on Gear VR via Galaxy S7/S6 (Edge) or Note 6/5/4? 

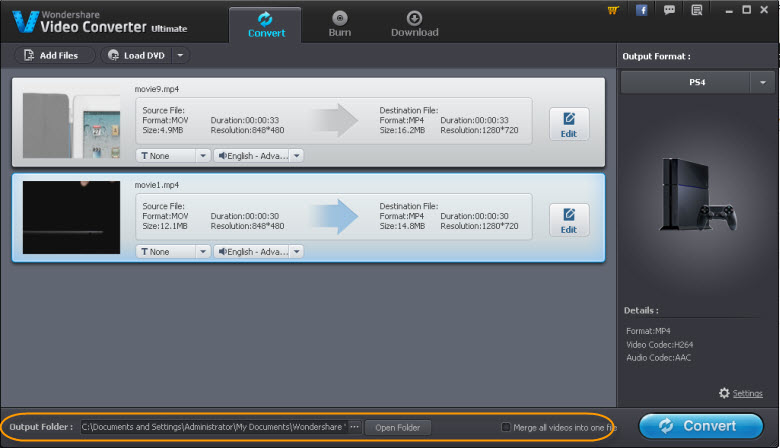
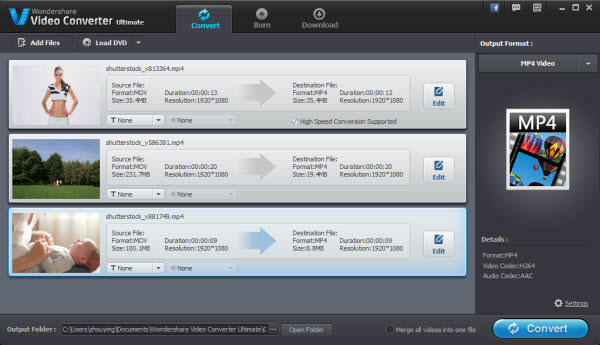
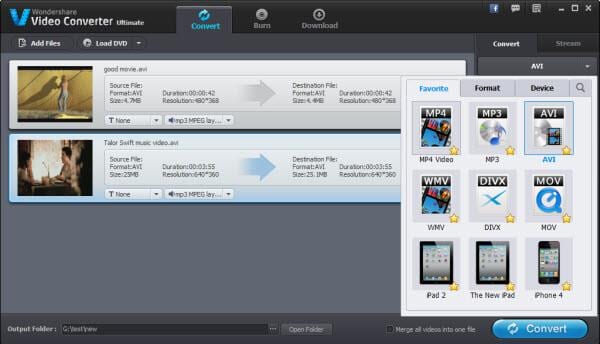
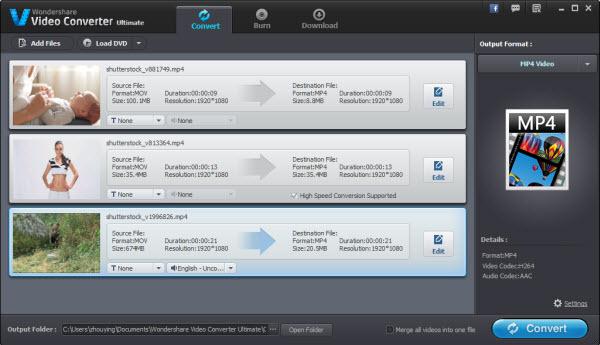
Step 1. Import 2D or 3D videos files to the 3D movie converter 

Directly drag your video sources then drop to the 3D MP4 converter or click the "Add Files" menu to add video folders for locating the video files in the whole folder at one time. The program support batch conversion which enables you to convert several videos to 3D SBS MP4 files on the go. 


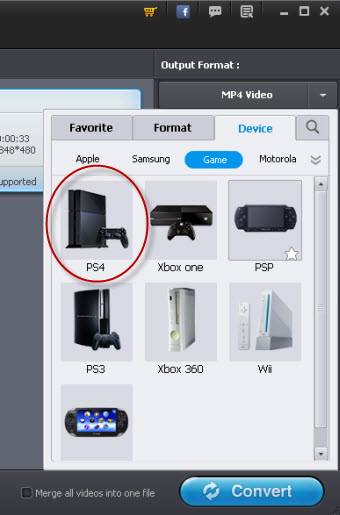
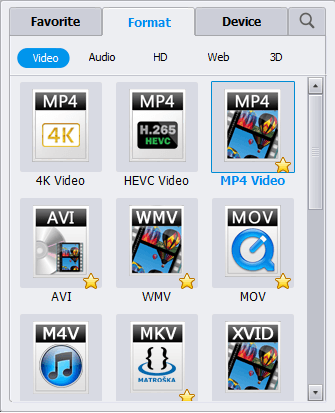
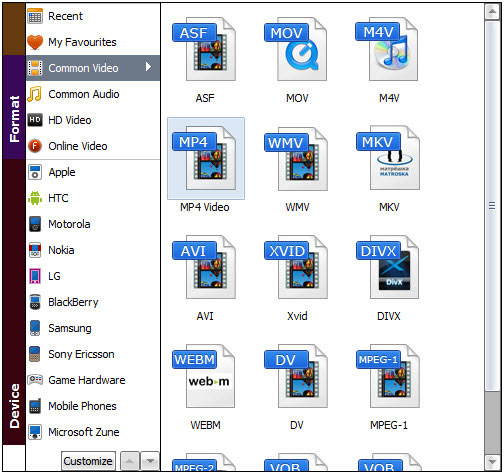
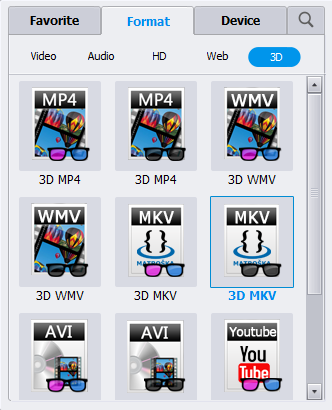
Step 2. Set 3D SBS MP4/MKV as your output format 

Almost all popular 3D output formats are provided in the format list of the video converter. To watch mvoies on Gear VR with 3D effects, you can choose Side-by-Side(SBS) 3D MP4/MKV as output format. 


Step 3. Start to convert 2D video to 3D MP4 

Click "Convert" and let the Video Converter Ultimate accomplish the rest automatically. Now, equip your Gear VR, Samsung Smartphone and import these converted 3D SBS MP4 files and start your theatric 3D experience at home! BTW, you can also upload these files to your YouTube 3D page for sharing. 

Note: Pls make sure you have the correct smartphone. Yes, it's a silly instruction, but people have been known to make mistakes once in a while, so it doesn’t hurt to check. The Gear VR only works on the following Samsung Galaxy smartphones: Galaxy Note 5, Galaxy Note 4, Galaxy S6/S6 Edge/S6 Edge+, and Galaxy S7/S7 Edge. 

To view your SBS 3D video files on your Gear VR, follow these steps: 

1. On your MicroSD card file directory, navigate to Oculus > Movies > Your Movies 
2. Create a new folder within "Your Movies" and label it "3D" 
3. Import or move your SB 3D videos into your newly created "3D" folder 

Once you have created your 3D content folder and imported compatible video files, insert your MicroSD card into your Galaxy Note 4 (if it isn't already), slide the phone in your Gear VR, and put the virtual reality headset on your head. Then: 

1. Navigate to Oculus Cinema from the main menu 
2. Navigate to "My Videos" from the Oculus Cinema content library menu 
3. Select the 3D video you wish to view (if you followed the above steps it should have a "3D" label in the upper righthand corner) 
4. Choose the cinema mode to begin playback 

More Useful Tips: 

Source: http://isharesky.blogspot.com/2016/09/watch-3d-movie-on-gear-vr.html

Sunday, September 18, 2016

Stream and Play MKV on PS4 with original quality

This "Stream and Play MKV to PS4 guide" shows the process of converting any type MKV movies to PS4 playable media formats at faster speed and original quality. 

As a great home video game console, PS4 gets you more of everything: hundreds of games, free playable demos and tons of add-ons. Another feature is to play particular videos. Unfortunately, many type MKV is not one of them. So what if you really want to play MKV on PS4

Here an easy solution - Hivimoore Video Converter Ultimate is highly recommended. It allows user convert MKV to PS4 Support video/audio formats at fast speed, and offers the Media Server function which enables you directly stream MKV videos to PS4 via wifi. Then you will never be puzzled by "Does PS4 play MKV" or "Can PS4 play MKV". Not only that, it also supports converting many other PS4 unsupported video clips like H.265, FLV, MXF, WebM, WTV, ASF, MOV, RMVB, MOD, TOD, etc and unrecognized video container like MP4, AVI, etc to PS4 more friendly formats. Besides PS4, this best converter has the feature of converting all kinds of video formats for playback on PS3, PS Vita, PSP, Xbox One, Xbox 360, Wii and more. 

Read more: PS4 Supported Formats 

Before import the converted MKV files into PS4, you can also optimize them as your desire by changing the parameters like increase or decrease the volume of the video, adjust the video bitrate/size/sample rate, change audio channels, combine several MKV into one for PS4, etc. 

Here I'll show you the whole process of how to convert and stream your MKV movies to PS4 for smooth playback in detail, as well as more tips to stream media to TV. 

If you are Mac users, pls get the Mac version, the way is just the same. To begin with, download and install the best MKV to PS4 Converter. 


How to Convert MKV to PS4 playable format? 

Step 1. Add MKV File 

Run your MKV to PS4 Video Converter Ultimate, by default "Convert" tap will appear in front of you. Now add your MKV media files you want to convert. For adding file click on "Add Files" on left corner of the top or in middle screen. You can also use "Drag and Drop" for your files from file folder. 

After select "Add File" another window will appear, select your file destination in your computer and select "Open". 


Step 2. Select PS4 as Your Output Video Format 

After Select your targeted file you have to select PS4 as your required output format. 

For that purpose you have to click below "Output Format". 
Select "Device" tab from drop down menu. 
Under Format select "PS4". 

Tip: Many supported game consoles appear in that box. 


Step 3. Edit and Customised Your MKV Video (Optional) 

As we mention before "Wondershare Video Converter Ultimate" include many fancy options which make your video beautiful, customized and editable before you convert the file. 

Select "Edit" button, an editable small window appear. You can use its various key features e.g. 
"Trim" cut the video to any length. 
"Adjust" Crop, rotate frame and resolution setting. 
"Effect" Volume, Colour adjustment and Frames. 
"Watermark" add text / Image on video for copy right etc. 
"Subtitle" add subtitle on screen. 


After make your desired changing you may require, click "convert" button to start converting MKV to PS4 friendly format. 

How to Stream the converted MKV videos to PS4 via Media Server? 

Step 1. Connect your PC and PS4 to the same network 

Step 2. Launch Media Server, When it opens, the Media Server will automatically detect the available streaming devices in your network. Here you can choose you PS4 console from the bottom of the primary window. 

Step 3. Then you can hit the "Add Files" button to browse and import your video files. You can also navigate through the Computer option to directly locate you files with Media Server. 

Step 4. Hover over the a file and the "Play on TV" icon will appear. Just click the icon and the Streaming window will pop up. After a few seconds, your MKV file will be streamed to your PS4. Then you can control the playback process by adjusting volume or skipping chapter. You can also click the "T" button to choose subtitles or even download and embed subtitles automatically. 

See Also: 

Source: http://www.starstarsoft.com/play-mkv-on-ps4/

Friday, September 16, 2016

How to Import and Play DVD on QuickTime Player?

Want to watch DVD in QuickTime Player but find it hard to play DVD in QuickTime? Or seek for a solution to convert DVD to QuickTime MOV on Windows? A DVD ripping program is needed. Aimersoft DVD Ripper is your best choice to fast and easily rip DVD to QuickTime Supported video and audio formats like MOV. The app would not only help you convert DVD to QuickTime format, but helps you tip DVD to AVI, MPEG, MPG, MKVMP4, MOV, WMV3GP, M4V, MP3, MKA, AIFF, WMA, M4A, AC3, AAC, WAV, OGG, etc. 

Plus, the best DVD to QuickTime ripper can also Rip DVD to iPad, iPhone, Apple TV, Ansroid, Samsung Galaxy, iTunes, LG, HTC, BlackBerry, PS4, PS3, PSP, Xbox One, Xbox 360, Wii and many other players as well. 

Before you start to rip DVD to QuickTime on Window, you need firstly to make some preparation work: download and install this DVD Ripper. 


Note: If you are using QuickTime on Mac (including 10.12 and 10.11), try DVD Ripper for Mac to convert DVD format. 

How to rip DVD to QuickTime MOV with ease? 

Step 1. Load DVD movie 

Click the "Load DVD" button to load DVD movies to the program. The detailed information of your DVD movie will be displayed. You can then preview them and choose the chapters you want to rip. 


Tips: If you want to embed metadata information (like DVD movie editor, actors, conver, descriptions, etc.) to the DVD video, just click the Info button to open the metadata editing window. Then enter the DVD movie name and click the Search button. The best DVD to QuickTime Ripper will find out all the information for you. 

Step 2. Select Output Fromat and Destination Folder 

Click the "Profile" drop down list to select MOV (QuickTime playable format) as the output format. Then click "Output" drop down list to select a proper destination folder for output files if you want to change the current default output folder. 


Step 3. Edit the DVD file (Optional) 

The DVD editing functions enables you to customize your own videos in the following ways: 
A. Crop - Crop the video frame size for better visual effects on the player. 
B. Trim - Split the video clips to choose your favorite part of the DVD movies. 
C. Effects - You can change the video parameters like brightness, saturation, contrast and more. 


Step 4. Start to Rip DVD to QuickTime Supported Format 

After all preparations, click the Start button to rip your DVD movie to QuickTime MOV. When the conversion completes, click Find Target to get the converted MOV files and play them with QuickTime freely. 

How to play the ripped DVD movie on QuickTime Player? 

1. If QuickTime is the default media player on your computer, then you can double click the video and QuickTime Player will launch automatically and play the video files you choose. 

2. If QuickTime is not the default media player: 
Method 1: Find out the target folder and choose the video you want to play, right-click it and choose QuickTime as the open mode. 
Method 2: Launch QuickTime and click "File" > "Open File", then choose the video you want to play. 
Method 3: Directly choose and drag the files to the QuickTime player icon. After you releasing the mouse, QuickTime will launch automatically and open the videos you choose. 

Now know how to do the DVD to QuickTime MOV conversion? With DVD Ripper, ripping DVD to MOV or other popular video formats is no longer a hard task. 

Similar softwares: 
Top 1. Wondershare Video Converter Ultimate: Both Windows and Mac, would take the convenience of DVD to MOV conversion as a quick and simple-accessible task. With these two user-friendly software you can achieve your aim in only three steps no matter in Mac or in Windows. Support a wide range of DVD's file conversion such as MP4, AVI, MKV, VOB, DivX, AVI, MPEG, FLV and etc. with unsurpassed conversion speed up 30 times., built-in editor for editing purposes. Plus, you can download online videos and then burn own DVDs. 

Top 2. Pavtube ByteCopy: With it, you can remove copy protections, and rip the movies to a QuickTime Player compatible format .MOV with fast speed and high output video quality in Windows or Mac. In addition to MOV, it can also rip and convert DVD to all other regular video formats like MP4, M4V, MKV, FLV, AVI, WMV, 3GP, etc. Plus, ByteCopy can backup Blu-ray/DVD collection to multi-track MKV, ripping BD/DVD movies to MP4 and MOV with multiple audio streams, and converting BD/DVD from hard discs to virtually any popular video and audio format like m3u8, H.265, MKV, etc. so that you can freely watch movies on mobile devices, 3D TVs, PSP, PS4, PS3, Plex, WDTV Live, Roku 3 and more devices. 

Top 3. Leawo DVD Ripper: It could rip and convert DVD to video in MP4, WMV, MKV, FLV, F4V, etc. Also, as the best DVD ripper software, it could act as DVD audio ripper to convert DVD to audio in MP3, AAC, and other audio formats. By converting DVD to video and audio, it lets you enjoy DVD movies on any mobile device. The built-in handy video editor helps customize video effects, while the internal 2D to 3D converter creates 3D movies in different 3D effects. Other user-friendly features include: set profile parameters, select subtitle and audio track, merge files into one, etc. 

Related Articles: 

Source: http://www.hivimoore.com/2016/09/play-dvd-on-quicktime/

Tuesday, September 13, 2016

How to Rip and Copy DVD to NAS drive for streaming?

Outline: What’s the best DVD Ripper tool to rip DVDs to NAS and what file format to use? Hivimoore will tell you the full DVD to NAS Solution! 

NAS allows you to store your favorite DVD movies to NAS for backup or stream to Smart TV, Tablet, Samrtphone, TV Box, HD Media Player, Game Console, or other devices. While, before you can add DVD movies to NAS, you need to rip the content on DVD discs to NAS and your devices accepted formats first, such as MP4, MKV, AVI, etc., so that you can easy stream DVD movies from NAS to your devices for playback. 

There are many DVD Ripper applications available designed to rip and convert DVDs for NAS streaming and play properly on media devices.Wondershare Video Converter Ultimate orAimersoft DVD Ripper or Handbrakeare three of the dynamic DVD ripping tool that can help you achieve the goal effortlessly- rip DVD to a common video with high output video quality and fast ripping speed. 

Take Wondershare Video Converter Ultimate as an example: 

The Best DVD to NAS converter can help us finish DVD conversion bypassing DVD copy protection. It is capable of ripping DVD to MP4, AVI, MKV for NAS streaming with no quality loss; it also enables you to copy DVD main movies for backup onto NAS in .vob format. And what we've learned is that MP4 would be one best target format for it is fully compatible with nearly all media devices including iPad, iPhone, PS4, Xbox One S, Smart TV, Apple TV, etc. If you are running on Mac OS X, turn to Mac version. If you haven't got the software, download it now and let's start the DVD to NAS conversion. 

Download Windows | Download Mac 

How to rip and copy DVDs to NAS with original quality? 

Step 1. Add DVD files 

Launch the DVD ripping program for NAS devices . Then click "Load DVD" to import the DVD files you want to convert. To select the subtitles you like, simply click Subtitle and select the one you prefer. 


Step 2. Choose an output format 

Click "Out Format" bar and choose your desired format. 

a. If you want to transfer DVD to NAS retaining DVD quality and you have a lot of spare space, you can choose directly copy DVD disc and then burn them to an iso. That makes one file for the DVD. Make sure your media streamer can read .iso files first. 

b. If you want to store hundreds of DVD's on NAS, then rip the DVD to MP4, MKVAVI etc. compressed format. And click "Settings" bar, you can adjust the level of compression to suit the quality you want. 

Hot Search: DVD to QuickTime | DVD to Android | Create 3D movie for Gear VR |DVD to Windows Media Player | Play DVD on Windows 10 


Besides the wide range of supported formats you can choose between two presets: High Quality or Small Size, but you can also customize settings and change the encoder, resolution, frame rate, bitrate for video and encoder, channel, sample rate and bitrate for audio. 


Step 3. Start copying DVD to NAS drive 

Press the "Convert" button to start ripping DVD movies for NAS streaming.

When the conversion finishes, click "Open" button to find the output movie files. Make sure the wireless network connection is accessible among the NAS and HD TV or other media players. Then just enjoy the high quality DVD movies via NAS at ease. 

Download Windows | Download Mac 

Buy Windows | Buy Mac 

Useful Guides: 
How to Backup DVD to Hard Drive on Computer? 
Top 5 Best Youtube to MP3 Converters and Downloaders 
How to Insert MP4 into PowerPoint 2016, 2013, 2011, 2010, 2007, 2003, 2000, etc.? 
How to Play Movies on Galaxy S7/S7 Edge(DVD, iTunes, 4K and HD Video)? 
Convert Videos to H.265 (HEVC) Video on Windows or Mac 
About H.265, Best H.265 HEVC Converter and How to Convert H.265 on Windows/Mac 
Play MP4 video on PS4 from USB Drive 
How to Stream Media Files to PS3 via USB/Media Server for playing on TV? 
Convert Samsung NX1 H.265/HEVC to MOV, MP4, MPG, WMV for editing, playing
Play MKV, AVI, M4V, FLV, VOB, WMV, Xvid Videos on Galaxy S6/S6 Edge 
Play MKV movies on Android tablet or smartphone 
Watch 2K/4K, HD and Common Videos and Movies on any Kids Tablets 
Sync Music, Videos from PC/Mac to iPhone 6 (Plus) 
Get iTunes .m4v on Your Android Tablet or Smartphone 
Best Video/Audio File Formats for Galaxy Tab S 
Enjoy lossless FLAC files on iTunes and iPhone/iPod/iPad 
Encode MP4 to MPEG-2 for Playing in TV stations, TV receivers, DVD players, Non-linear editing software 
How to Play DVD on QuickTime Player? 

Source: http://www.starstarsoft.com/copy-dvd-to-nas/

Can Windows Media Player play DVDs on Windows 10?

Outline: Trying to use Windows Media Player to play your DVD, but an error message pops out: "Windows Media Player cannot play this DVD"? Hivimoore give you a full answer. 

Sometimes you might find it difficult to play DVD on Windows Media Player, One major reason is because of compatibility issues when it comes to decoders. What one needs is a DVD drive and a compatible DVD decoder installed on their laptop or computer. On the other hand, it is easier to solve problems associated with missing DVD decoders. 

However, the truth is that Windows Media Player only supports the default movie format. This means that for you to play DVD on Windows Media Player you will have to convert DVD to Windows Media Player supported format for instance (WMV, WMA and AVI). Well, in this case you will need a DVD Ripper program that has the capacity to convert DVD to other file supported by Windows Media Player. Aimersoft DVD Ripper is a program that can give you optimum results. 

This is a high quality DVD ripper software that supports virtually all the Windows Media Player supported file format. In addition, it has the capability to convert both homemade and commercial protected DVD movies to Windows Media Player friendly file formats. It is also fast in ripping but you are always assured of a high quality output video that you can also edit, watch, share with friends without mentioning playing in different devices. 

  • Convert DVD to Windows Media Player acceptable format 
  • Supportts play DVD, Video_TS, ISO, IFO files and more 
  • Freely edit your DVD movies to fit with Windows Media Player 
  • One click to embed metadata information to DVD files 
  • Rip DVD to other formats: MKVMP4MOVM4V, FLV, F4V, VOB, MPG, 3GP, etc. 
  • Rip DVD to popular devices like iPad AiriPhone, iPod, PSP, Zune, Creative Zen, Amazon Kindle, Google Nexus, Surface Hub, Archos, Xbox 360, Xbox One, PS3, PS4, PSP, PS Vita, Wii, Apple TV, Samsung Galaxy Tab series, Galaxy Note seriesGalaxy S7, etc. 
  • 6X fast ripping speed and excellent video quality. 
  • The equivalent Mac version is Mac DVD ripper software. 
Read more: Aimersoft DVD Ripper Review 

Free download DVD to Windows Media Player converter: 


Steps: Let you play any DVDs on Windows Media Player 

Step 1. Typically, you will begin by inserting your DVD in your computer drive after which you will be required to run the video converter software. And click "Load DVD" to import the files you want to rip. If you want to merge all DVD titles together, tick "Merge into One File" on bottom of the mian window. 


Step 2. Select WMV from the Profile list (Windows media video format) as the required output format. The best thing with such converter they give you options to enhance your video experience by customizing the video and audio settings, for instance (Video Codec, Video Bitrate, Audio Codec, Audio Bitrate, Audio Channel) 


Step 3. When you are done with the settings, click the Convert button and initiate the conversion of DVD to Windows Media Player supported file. When the conversion is done click "Open" to locate the converted WMV file on your laptop or computer. 

Just free try the best DVD Ripper and play DVD movies on Window Media Player anytime you like. 

You can also learn more other similar softwares: 

Editor's Recommendation: 
Source: http://www.starstarsoft.com/play-dvd-on-windows-media-player/ 

Extract Audio from DVD to MP3, AAC, FLAC, WMA, AC3

Have you been looking around for a software that will be able to extract the audio from your DVD and then convert it to an MP3, FLAC, WMA, AAC, AC3, M4A, or WAV file? This might perhaps be your ideal DVD audio extractor! 

This guide shows you how to use Aimersoft DVD Ripper (Review) to rip audio from DVD and save the audio files as MP3, FLAC, AAC, MKA, AC3, WMA, etc. so that you can enjoy the DVD movies on any regular MP3 players or other music players. And you can also convert your DVD movies to AVIMP4, WMV, MOVMKV, VOB, FLV, SWF, F4V, M4V, etc. for playback anywhere you like. 

First of all, download the DVD Audio Extractor. (The Windows version supports Windows 10/8/7/XP/Vista while the Mac version supports Mac OS X 10.12, 10.11, 10.9, 10.8, 10.7 and 10.6.) 


Note: If you are using the DVD Audio Extractor on Mac, try DVD Ripper for Mac to convert DVD format. 

How to Extract Audio from DVD to MP3, FLAC, AAC, AC3, WMA, MKA, etc.? 

Step 1. Run DVD Ripper and Load DVD file into it 

Follow the instructions to install and run DVD ripper. Then click Load DVD to import your DVD movies to the program. Or directly drag the DVD files to the main interface to load media files. ISO and IFO files are also supported. After the files are loaded, you can choose the audio tracks you like so as the extract the right audio files you want from the DVD.


You can choose to convert the whole DVD movie or just part of it. All you need to do is to highlight and titles that include the audio files you want to keep. 

Step 2. Choose the output Audio format and start the conversion 

Click "Profile" on the interface and you will see a large number of formats for you to choose from. At this moment, just select the format you want. 


Step 3. After the above steps, just click "Start" to start conversion if you don't like to make some settings. But if you would like to set some parameters to get the best effects for your audio, you can just click the "Settings" button to make it.


Other DVD Useful Tips


Other Software to Extract Audio from DVD to MP3, FLAC, AAC, AC3, WMA, MKA, etc. - Wondershare Video Converter Ultimate 

The Wondershare Video Converter Ultimate can do all that for you! It can help you convert Audio files from Videos and DVDs to all popular audio formats: MP3, FLAC, AAC, AC3, MKA, WMA, M4A, etc. In fact, it can do much more, such as creating a backup of your DVD, save it into an ISO file image, convert it for playbacks on your portable devices and download online videos. You can also edit the video files as well as adjust the settings according to your video needs. It's the most ideal DVD audio extractor for you!  (Read Review)

Download Windows | Buy Windows 

Download Mac | Buy Mac 

Step 1: Upload your DVD 

You'll be automatically directed to the Convert's main menu once you've launched the Video Converter Ultimate. Therefore, please make sure you've navigated yourself to the Burn's window before you upload your DVD. If your DVD videos are stored in softcopies, you can Add Files by browsing the local directory folders or external storage that's plugged in. Alternatively, just click on Load DVD to insert your physical DVD disc. 


Step 2: Edit your DVD (optional) 

There's an Edit icon to your uploaded video files or DVDs that will lead you to the editing screen as below. If you only need to extract a certain length of music or soundtrack from the DVD, simply use the trim marker feature in the built-in editor. In the latest version of the Video Converter Ultimate, you can now choose to either delete or keep the selected parts by adding several markers simultaneously. 

Step 3: Extract and convert DVD audio to MP3, AAC, FLAC, M4A, WAV file 

After that, you can carry on to convert the extracted DVD audio to an WAV file as you've wished. Other than the WAV file format, you can also choose to save it as an MP3, M4A or other audio file formats that's supported by the Video Converter Ultimate. Now you can click on the Convert button! Simply retrieve your converted audio file by clicking on the pop-up message that appears on your screen once it's finished. 


Other Feature: Download from online
Go to the Download's window, click on the + Add URL and then copy-and-paste the video's URL in the pop-up box (in the URL's column). The file will start to download once you've clicked OK. Then, click on Finished on your left-hand's navigation pane and select Convert to from the arrow icon on the far-right of the downloaded file. You can repeat from Step 1 to 3 as mentioned above to convert the files to your preferred output format.


Other Video & DVD Useful Tips

Sunday, September 11, 2016

How to Rip DVD on Windows 10 with fastest speed?

Have got a bunch of DVD movies? But you want to play your favorite DVDs on Windows 10? Well, you can "rip" that DVD or turn it into a movie file on your Windows 10 computer - to play it wherever you want. Here's how to do it. 

Ripping a DVD movie on Windows 10 can seem complicated, but it's actually pretty simple. There are a lot of ways to do it and a lot of different Windows 10 DVD Ripper programs out there, but our favorite method uses a program called Handbrake or Aimersoft DVD Ripper. They're easy to use, it's available for Windows and Mac, and it'll rip your DVD into compatible formats on Window 10. 

Take Aimersoft DVD Ripper as an example: 

Aimersoft DVD Ripper (Review) enables users to rip any DVD disc - even those that have been region-locked or copy-protected - and rip DVDs for use on a huge range of smartphones, tablets, media players and smart TVs. It can handle all the most recent encryption technologies, including DVD CSS, RCE, Sony ArccOS and Disney X-Project DRM, and it's updated continuously to handle any new protection schemes. 

The best Windows 10 DVD Ripper can rip the copy-protected DVD movies to MP4, MKV,AVI, WMV, MPEG etc, on Windows 10 as well as ripping any DVDs to iPhone/iPad/Android/Windows Tablet/Phone with possible highest image/audio quality for playback DVD videos on the move. Owing to Hyper-threading technology and Multi-core utility, it takes only a matter of minutes to rip a feature-length movie DVD. In consideration of ease at use, conversion speed and output quality, Aimersoft DVD Ripper is absolutely the best DVD ripper for Windows 10. In addition, you can customize settings to trim/crop/add subtitles for DVD video or adjust parameters (bit rate, aspect ratio, resolution, codec and more) with this best DVD Ripping software for Windows 10 to have the output video played on different devices with greatest effect. Plus, with NVIDIA CUDATM technology, it brings 30X faster conversion speed than other Windows 10 DVD Rippers. 

Note: If you are a Mac user, you can use Aimersoft Mac DVD ripper to accomplish ripping DVD movies on Mac (El Capitan and macOS Seirra included). 

Free download DVD Ripper for Windows 10: 


Steps to Rip DVD on Windows 10 

Step 1. Load DVD files to DVD Ripper 

Install and launch the best DVD Ripper on your Windows 10, then insert the DVD disc to your computer's hard drive and load the DVD files to the converter. You can also add DVD folders or ISO image files to rip. When the files have been loading, you can preview them and take snapshots of the movie scenes. 


Step 2. Choose the output video format 

Here comes to choosing the output video format by clicking the "Profile" column. In the pop-up list, you need to choose one of the video formats as the output format. I recommend you MP4, because it is the most widely used video format, and also a nice format helping to copy a DVD to Windows 10 computer. 


If you prefer to watch these output videos on a device, you can choose the corresponding device as the output format. These videos will fit on the device flawlessly, because the app has already optimized the video settings beforehand. 


Step 3. Start to rip DVD on Windows 10 

When you have finished all the settings, you can simply click "Start" to rip DVD to video or audio format on Windows 10. Just wait for the conversion to be done. 

Still looking for ways to rip DVD in Windows 10 so that you can play DVD movies on your Windows 10 or portable devices like iPhoneiPad Air 2AndroidAmazon KindleSurface, Samsung Galaxy S7, S6, Note 5PS4Xbox One, Apple TV, etc.? Just download the windows 10 DVD Ripper and follow above two ways to Play DVD on Windows 10 with ease. 

Related Softwares: 

Wondershare Video Converter Ultimate - If you have some HD Videos, 4K Videos, Music as well as DVD collections and want to rip, play them in Windows 10. Don't worry, there are some shortcuts you can resort to. Luckily, there's a top-ranked Windows 10 Video Converter Ultimate - Wondershare Video Converter Ultimate. That's to convert your DVD (including the latest DVDs) and HD, 3D, 4K Videos as well as Audio files into the Windows 10 friendly formats like an WMV, MP4, AVI, MPEG, etc. Besides being able to playback a DVD smoothly, you can also back up your DVD from scratch. Very useful, isn't it? It's packed with great quality, high efficiency and simplicity (in terms of interface). 

Learn more DVD Ripping Tips: